Your digital lines are meticulously drawn around your stores. You’ve launched the campaigns. But the results feel… scattered. That initial thrill of seeing a location-based alert bring a customer through the door has been replaced by the frustrating reality of managing a dozen, or even a hundred, overlapping circles on a map. Is this campaign cannibalizing that one? Why did that notification fire when the customer was still three blocks away? The complexity has become a tangle of confusing data, and you’re left with the nagging question: Is all this effort even worth it?
This is the exact point where most retailers get stuck. They recognize the immense potential of geofencing but find that scaling up introduces a level of complexity that can paralyze a campaign before it ever truly begins. The truth is, managing multiple geofences isn’t just about scaling; it’s about adding layers of intelligence. It’s about engaging customers not just at your doorstep, but across their entire journey—from the competitor’s parking lot to the local coffee shop they visit every morning.
If you are ready to stop managing lines on a map and start architecting a true, revenue-driving strategy, then you are in the right place. Consider this your technical and strategic blueprint. Together, we will deconstruct the challenges of managing multiple geofences and provide a clear, actionable framework to build hyper-personalized customer experiences that drive measurable, predictable foot traffic to your stores.
The “Why”: Strategic Imperatives for Multiple Geofences

Operating with a single geofence around your store is a sound first step, but it’s fundamentally a defensive strategy. To truly leverage location intelligence, you must go on the offense. The deployment of multiple, strategically placed geofences allows a retailer to transform their marketing from a monologue into a dynamic conversation with a customer, based on their real-world movements.
- Granular Customer Segmentation: A single fence treats every nearby user identically. A multi-fence strategy allows you to practice advanced customer segmentation. For example, you can create a geofence around a local university to target students with specific back-to-school offers, another around a business park for a lunchtime special, and a third around a high-income residential area with promotions for premium products. The messaging and offers are tailored to the context of the location, dramatically increasing relevance and response rates.
- Conquesting and Competitor Targeting: Why wait for customers to find you? Proactively engage them where they are most vulnerable to suggestion: your competitor’s location. By placing a geofence around a rival store (a practice known as “geo-conquesting”), you can send a timely, compelling offer to a user as they enter or dwell in that area. A message like, “Considering a new pair of running shoes? See our award-winning selection just 2 blocks away and get a free gait analysis,” can be exceptionally effective at redirecting retail foot traffic.
- Mapping the Customer Journey: Your customer’s path to purchase doesn’t begin at your door. By mapping the customer journey, you can identify key touchpoints to influence their decisions earlier. Place geofences around complementary businesses (a gym if you sell athletic wear, a movie theater if you sell consumer electronics), major transit hubs, or event venues. This allows you to plant a seed of interest long before they have made a final purchasing decision, making your brand top-of-mind when they are ready to buy.
Designing Your Geofence Architecture: A Technical Blueprint

The effectiveness of a multi-fence strategy hinges on its underlying structure. An ad-hoc approach will invariably lead to data chaos and poor user experience. A disciplined, architectural approach is required for scalable success.
- Hierarchical Structuring: Think of your geofences not as a flat list, but as a nested hierarchy. For a retail outlet in a large shopping mall, the structure might look like this:
- Level 1 (Macro): A large geofence around the entire mall property. Trigger: General brand awareness message.
- Level 2 (Micro): A smaller geofence around your store’s immediate entrance. Trigger: A specific, high-value “Welcome” offer.
- Level 3 (Pico): A tiny geofence or beacon inside the store, perhaps within the shoe department. Trigger: A message about a special on socks with any shoe purchase.This prevents message collision and ensures the most relevant notification is delivered based on the user’s precise location.
- Consistent Naming Conventions: This is a non-negotiable rule for maintaining data integrity. A chaotic naming system makes analysis impossible. Implement a standardized syntax that is both human-readable and machine-parsable. A robust format is
Region-City-Location-Purpose. For example:SoCal-Redlands-CitrusPlaza-CompetitorConquestorPNW-Seattle-MainSt-StorefrontEnter. This simple discipline will save countless hours during campaign analysis. - Managing Overlap and Proximity: When two geofences are close together, a user can trigger both simultaneously, resulting in a spam-like experience. Your geofencing platform should allow you to set rules to mitigate this. Implement “cool-down periods” (a user cannot receive another notification for X hours) and prioritization logic (if a user triggers a Level 2 and Level 3 fence, only the Level 3 message is sent). This ensures your engagement feels intelligent, not intrusive.
Choosing the Right Platform: Tools for Scalable Management

Your ability to execute a sophisticated strategy is directly limited by the capabilities of your tools. For small businesses, selecting a platform that balances power with usability is paramount. Avoid platforms designed for single-fence simplicity; you will outgrow them.
- Essential Platform Features: When evaluating software, look for these critical features:
- Bulk Management: The ability to upload, edit, and manage hundreds of geofences from a single CSV file or via an API. Manually creating each fence is not scalable.
- Tagging and Grouping: The functionality to categorize your geofences with tags (e.g., “Competitor,” “Tier1_Market,” “Event”) for easy filtering and campaign assignment.
- Robust A/B Testing: A built-in feature to test different messages, offers, or even geofence sizes against each other.
- Detailed Location Analytics: The platform must provide data not just on triggers, but on the downstream effects on user behavior.
- CRM & POS Integration: The ability to connect location data with your customer and sales data to close the loop on attribution.
- Key Industry Players (Entities):
- User-Friendly & Scalable: Platforms like PlotProjects and Radar are excellent starting points. They offer powerful APIs and dashboards designed for marketers to manage complex campaigns without needing a team of developers.
- Messaging-Focused: Tools like Airship excel at integrating geofence triggers into a broader mobile messaging strategy (push, in-app, SMS).
- Enterprise Grade: For massive, data-intensive operations, platforms like the Esri ArcGIS suite provide unparalleled geospatial analysis capabilities, though they represent a significant investment in cost and expertise.
The Science of Sizing & Placement: Precision and Relevance
A common question I receive is, “What is the optimal size for a geofence?” The answer is rooted in human geography and user experience: a geofence should be large enough to be triggered reliably, but small enough to be contextually relevant.
- The 5-Minute Rule: A highly effective best practice is to size your geofences based on a 4-5 minute travel radius. For dense, urban pedestrian zones, this might be a small 150-200 meter radius. For suburban locations where customers arrive by car, this may expand to a 1-2 kilometer radius along primary travel routes. Setting a 10-kilometer fence around your store is technically possible, but the message will be irrelevant to a user who is 15 minutes away, leading to notification fatigue.
- Leveraging Geospatial Data: Do not place your fences based on guesswork. Use location analytics tools and data sources. Analyze where your existing customers live and work. Identify areas with high concentrations of your target demographic. Overlay foot traffic data to see which nearby locations (parks, office buildings, transit stops) are true hotspots of activity versus those that look promising on a map but are functionally dead zones.
- Dynamic and Temporary Fences: Your geofence strategy should not be static. Use a platform that allows for dynamic fence creation via an API to target transient events. Is there a weekend street festival, a concert, or a farmer’s market nearby? Deploy a temporary geofence around that event for its duration to capture relevant, high-intent foot traffic.
Crafting Context-Aware Messaging: The Right Message at the Right Time

The geofence is merely the trigger; the message is what drives the conversion. The failure of most geofencing campaigns is not in the technology, but in the lack of creativity and personalization in the copy. A generic “10% off your purchase” is an invitation to be ignored.
- Trigger-Based Messaging Logic: The content of your push notification must match the user’s specific context.
- On Enter: When a user enters a geofence around your store. Message: “Welcome to our Redlands location! Show this message for a free espresso while you shop.”
- On Exit: When a user leaves a geofence without making a purchase. Message: “Leaving so soon? Don’t forget that new jacket you looked at. Order online in the next hour with free shipping.”
- On Dwell (in a competitor’s fence): After a user has been inside a competitor’s geofence for 5+ minutes. Message: “We see you’re shopping for electronics. At our store 3 minutes away, our experts guarantee they’ll beat any price.”
- Radical Personalization: The highest level of engagement comes from connecting location triggers to your CRM data. If you know a customer (e.g., Jane Doe) previously purchased a specific brand of hiking boots, a geofence trigger near a state park could send a message like: “Hi Jane, perfect weather for a hike! We just got new all-weather gear from The North Face that would go great with your boots.” This transforms a generic ad into a valued personal recommendation.
Campaign Testing and Optimization: A Data-First Approach
Assumptions are the enemy of ROI. Every element of your multi-fence strategy must be tested, measured, and optimized with scientific rigor. My core value of data integrity is most critical in this phase.
- A/B Testing Geofence Creative: Never settle on your first message. Systematically test variables across different geofenced segments.
- Test 1 (Offer): Free gift vs. 15% discount.
- Test 2 (Copy): Urgency-driven (“Offer ends today!”) vs. Scarcity-driven (“Only 5 left in stock!”).
- Test 3 (CTA): “Shop Now” vs. “Get Directions.”Measure the response to each and iterate, rolling out the winning combination to a larger audience.
- The Indispensable Control Group: This is the single most important and most frequently ignored aspect of testing. To truly know if your campaign is working, you must compare it to nothing. Your platform must allow you to hold back a statistically significant portion of users within the geofence as a control group that does not receive the notification. Only then can you accurately calculate the “lift” — the percentage increase in visits or sales directly attributable to your campaign. Without a control group, you are simply guessing at your impact.
- Frequency Capping: An essential tool for preserving user experience. A customer walking through a heavily-fenced downtown area could be bombarded with notifications, leading them to turn off location services or delete your app. A best practice is to implement a frequency cap, such as limiting notifications to no more than one every 24-48 hours, regardless of how many fences they trigger.
Measuring What Matters: Analytics and ROI
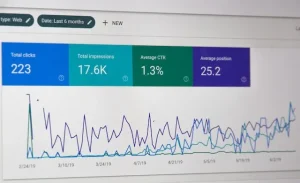
Data from a multi-fence campaign can be overwhelming. The key is to focus on metrics that directly correlate to business objectives, not vanity metrics like “triggers” or “impressions.” Your goal is to prove return on investment.
- Key Performance Indicators (KPIs) for Geofencing:
- Store Visit Lift: The single most important metric. This is the percentage increase in physical store visits from your targeted group compared to your control group. A 5% lift means your campaign drove 5% more people into your store than would have come otherwise.
- Cost Per Visit (CPV): The total cost of the campaign divided by the number of attributed store visits. This tells you your customer acquisition cost for that specific channel.
- Dwell Time Analysis: Are the customers you’re driving high-quality? Analyzing the average dwell time of users who received a notification versus those who didn’t can indicate engagement levels.
- Conversion Rate: The ultimate metric. By integrating with your Point-of-Sale (POS) system, you can track what percentage of users who received a notification went on to make a purchase.
- Geotargeting Attribution Models: Attribution is the science of assigning credit. Your platform should offer different models. A “last-touch” model gives 100% of the credit to the final geofence a user triggered before visiting. A “time-decay” model gives more credit to triggers that happened closer to the time of the visit. Understanding your attribution model is critical for accurately judging the performance of individual geofences within your network.
Real-World Success: Retail Geofencing Case Studies
Theory and technical specifications are crucial, but seeing these strategies in action provides a tangible vision of what is possible.
- Geo-Conquesting: Burger King’s “Whopper Detour”The canonical example of competitor conquesting. Burger King placed geofences around thousands of McDonald’s locations. When users of the BK app came within 600 feet of a McDonald’s, it unlocked a coupon for a 1-cent Whopper, but the coupon could only be redeemed after the user proceeded to a nearby Burger King. It was audacious, brilliant, and drove over 1.5 million app downloads.
- Enhancing the In-Store Experience: SephoraSephora’s “Store Companion” feature is a masterclass in adding value. When a geofence detects a loyalty member has entered a store, their app transforms. It pulls up their loyalty card, past purchase history, and saved items, empowering the customer and equipping store associates with the data to provide hyper-personalized service.
- Streamlining Operations: WalmartWalmart uses geofencing not just for marketing, but for operational efficiency. For their curbside pickup service, a geofence around the store alerts associates the moment a customer’s vehicle enters the parking lot. This triggers the team to prepare the order, dramatically reducing customer wait times and improving the overall service experience.
Conclusion: The Future is Hyper-Local
We have moved from the “what” and “why” to the “how.” It should now be clear that managing multiple geofences is less about blanketing an area with digital circles and more about precise, data-driven architecture. The retailers who succeed will be those who treat their geofence network as a strategic asset.
- Summary of Core Principles:
- Architect Before You Build: Design a logical hierarchy and naming convention.
- Let Data Drive Placement: Use analytics, not assumptions, to position your fences.
- Context is King: The message must be as relevant as the location.
- Test Rigorously: Use A/B tests and control groups to prove your impact.
- Measure for ROI: Focus on metrics like visit lift and cost per visit.
- Future Trends: The field continues to evolve. The integration of AI and machine learning is beginning to enable predictive geofencing—targeting users based on where they are likely to go next. At the same time, consumer privacy remains paramount. All strategies must be built on a foundation of transparency and user consent, fully compliant with regulations like GDPR and CCPA.
Your journey begins now. Start small. Map out a multi-fence strategy for a single competitive market. Test your messaging, measure the lift, and then, with a proven model in hand, scale your success.


